Dry-brushing Acrylic Paints
I love to dry-brushing paints, but today we’re talking about acrylic paint. Lets go over a few things you will want to consider. The thickness of the paint, what brushes to use and what is the drying time are just a few things to think about.
Believe it or not the brush can be any size but it needs to have a flat edge. I use, stiff natural bristle, soft sable, fan and synthetic brushes when painting fur. I dry-brush glazes over opaque color shapes which adds layers of depth to the shadows. This bring out the highlights creating a brilliant effect. The brush stroke help to identify your style.
Things to remember when dry-brushing
- Your brush is dry and your working an area that has already dried.
- Less is more when it comes to paint.
- The thickness depends on the paint and whether you add a glazing medium. Just use very little on the tip of the brush.
- Use a separate dry piece of paper or pallet to start your brush strokes so you know the effect you will get with the brush.
- Leave each layers of paint dry before you apply a new color.
Dry-brushing is a fast way to add texture, depth and interest to the shape in the picture area. The paint is uneven not smooth because it is not diluted and will have a variation of color.
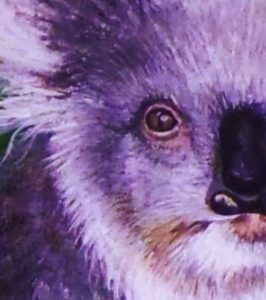
In this acrylic painting you can see dry-brushing in a specific direction gives the fur a texture I wanted and adds to the illusion of a mass.

Acrylics are great to dry-brush because they dry quickly and permanently. I can work many colors in any direction giving me the control I want over this medium, where water color is not permanent and oils take time to set up.
You can see the rest of the painting here in my acrylic gallery.